axios with proxy and custom SSL certificate

This article summarizes what made me struggle days.

Fix https-proxy-agent to support CA

It was originally proposed here by maslakov.

1
2
3
4
5
6
7
8
9
10
11
12
13
14
15
16
import { HttpsProxyAgent, HttpsProxyAgentOptions } from 'https-proxy-agent';
import { ClientRequest, RequestOptions } from 'agent-base';
import { Socket } from 'net';

export class PatchedHttpsProxyAgent extends HttpsProxyAgent {
private ca: any;

constructor(opts: HttpsProxyAgentOptions) {
super(opts);
this.ca = opts.ca;
}

async callback(req: ClientRequest, opts: RequestOptions): Promise<Socket> {
return super.callback(req, Object.assign(opts, { ca: this.ca }));
}
}

Working prototype

1
2
3
4
5
6
7
8
9
10
11
12
13
14
const axios = require('axios');
const HttpsProxyAgent = require('https-proxy-agent');
const ca = require('ssl-root-cas/latest').create();

ca.addFile(certificateFilePath);

const httpsAgent = new HttpsProxyAgent({
protocol: 'http',
host: 'proxy_host',
port: 8080,
ca,
});

axios.defaults.httpsAgent = httpsAgent;

References

  1. PatchedHttpsProxyAgent

Drag sorting Ant Design Table with dnd kit

Introduction

I was trying to implement Drag sorting with handler for Ant Design Table. I found that react-sortable-hoc is not going to be enhancement further and the author encourages to use dnd kit. This article summarizes what I did to implement it with dnd kit.

Prepare dummy data

1
2
3
4
5
6
7
8
9
10
11
12
13
14
15
16
17
18
19
20
21
22
23
24
25
26
function App() {
const columns = [
{
key: "dragHandle", dataIndex: "dragHandle", title: "Drag",
width: 30,
render: () => <MenuOutlined />,
},
{
key: "key", dataIndex: "key", title: "Key",
},
];

const dataSourceRaw = new Array(5).fill({}).map((item, index) => ({
// This will be transformed into `data-row-key` of props.
// Shall be truthy to be draggable. I don't know why.
// To this end, index of number type is converted into string.
key: index.toString(),
}));
const [dataSource, setDataSource] = useState(dataSourceRaw);

return (
<Table
columns={columns}
dataSource={dataSource}
/>
);

The important thing here is that the key used to identify an item must be truthy value. I struggled with a situation that the first item is not draggable. After some minutes of debugging, I found that if the key is falsy value, it is not draggable. But I couldn’t find the root cause for this.

Define a state variable for drag overlay

1
2
// ID to render overlay.
const [activeId, setActiveId] = useState(null);

activeId will be used for determining whether to render drag overlay or not.

Convert Table into sortable preset of dnd kit

1
2
3
4
5
6
7
8
9
10
11
12
13
14
15
16
17
18
19
20
21
22
23
24
25
26
27
const sensors = useSensors(
useSensor(PointerSensor),
useSensor(KeyboardSensor, {
coordinateGetter: sortableKeyboardCoordinates,
})
);

return (
<DndContext
sensors={sensors}
collisionDetection={closestCenter}
onDragEnd={handleDragEnd}
>
<Table
columns={columns}
dataSource={dataSource}
components={{
body: {
wrapper: DraggableWrapper,
row: DraggableRow,
},
}}
/>
{/* Render overlay component. */}
<DragOverlay>{activeId ? activeId : null}</DragOverlay>
</DndContext>
);

According to sortable single container, enclose Table in DndContext, wrap body (tbody) with SortableContext and implement useSortable in row (tr). In this example, DraggableWrapper implements SortableContext and DraggableRow implements tr with useSortrable.

DragOverlay is rendered only when activeId has a valid ID value.

DraggableWrapper

1
2
3
4
5
6
7
8
9
10
11
12
13
14
15
16
17
18
19
20
21
22
function DraggableWrapper(props: any) {
const { children, ...restProps } = props;
/**
* 'children[1]` is `dataSource`
* Check if `children[1]` is an array
* because antd gives 'No Data' element when `dataSource` is an empty array
*/
return (
<SortableContext
items={children[1] instanceof Array ? children[1].map((child: any) => child.key) : []}
strategy={verticalListSortingStrategy}
{...restProps}
>
<tbody {...restProps}>
{
// This invokes `Table.components.body.row` for each element of `children`.
children
}
</tbody>
</SortableContext>
);
}

DraggableWrapper implements SortableContext. items shall be a list of keys to identify items, not items themselves. Inside tbody, children is a list of rows and each item will invoke Table.components.body.row, which is DraggableRow.

DraggableRow

1
2
3
4
5
6
7
8
9
10
11
12
13
14
15
16
17
18
19
20
21
22
23
24
25
26
27
28
29
30
31
32
33
34
35
function DraggableRow(props: any) {
const { attributes, listeners, setNodeRef } = useSortable({
id: props["data-row-key"],
});
const { children, ...restProps } = props;
/**
* 'children[1]` is a row of `dataSource`
* Check if `children[1]` is an array
* because antd gives 'No Data' element when `dataSource` is an empty array
*/
return (
<tr
ref={setNodeRef}
{...attributes}
{...restProps}
>
{
children instanceof Array ? (
children.map((child: any) => {
const { children, key, ...restProps } = child;
return key === "dragHandle" ? (
<td {...listeners} {...restProps}>
{child}
</td>
) : (
<td {...restProps}>{child}</td>
);
})
) : (
children
)
}
</tr>
);
}

DraggableRow implements tr with useSortable, where id must be the same with a key of each item. We want to make a row draggable, so assign setNodRef to tr. And we want to enable dragging only when a user grabs a drag handle, so assign listeners to td containing a drag handle.

handleDragStart

1
2
3
4
function handleDragStart(event: any) {
const { active } = event;
setActiveId(active.id);
}

handleDragEnd

1
2
3
4
5
6
7
8
9
10
11
12
13
function handleDragEnd(event: any) {
const { active, over } = event;
if (active.id !== over.id) {
setDataSource((items) => {
// In this example, find an item, where `item.key` === `useSortable.id`.
const oldIndex = items.findIndex((item) => item.key === active.id);
const newIndex = items.findIndex((item) => item.key === over.id);
return arrayMove(items, oldIndex, newIndex);
});
}
// Stop overlay.
setActiveId(null);
}

handleDragEnd performs swapping two items. Here, to find indexes of two items in data source, we need to compare key of an item and id of useSortable.

You can find demo here.

Quick start on ANTLR4 in Rust - part3

This is my note in adopting and learning ANTLR4Rust

Series


In the previous article, we implemented a parser with internal state variables. However, if a grammar is huge, it is practically impossible to manage a huge number of state variables. Alternatively, a visitor-like approach can be used.

In an exit method of the root rule in the Listener, we can grab the current context and its children and call custom parser methods:

1
2
3
4
5
6
7
8
9
10
11
12
13
14
15
16
17
18
19
20
21
22
23
24
25
26
27
28
impl Listener {
fn hdr(&self, ctx: &HdrContextAll) -> Row {
let row_ctx = ctx.row().unwrap();
self.row(&row_ctx)
} fn row(&self, ctx: &RowContextAll) -> Row {
let mut row = Row::new();
let field_ctx_list = ctx.field_all();
for (_i, field_ctx) in field_ctx_list.iter().enumerate() {
let field = self.field(&field_ctx);
row.push(field);
}
row
} fn field(&self, ctx: &FieldContextAll) -> String {
ctx.get_text()
}
}
impl CSVListener for Listener {
fn exit_csvFile(&mut self, ctx: &CsvFileContext) {
let hdr_ctx = ctx.hdr().unwrap();
let header = self.hdr(&hdr_ctx);
self.csv.header = header;
let row_ctx_list = ctx.row_all();
for (_i, row_ctx) in row_ctx_list.iter().enumerate() {
let row = self.row(&row_ctx);
self.csv.rows.push(row);
}
}
}

The minimal working example can be found here.

Quick start on ANTLR4 in Rust - part2

This is my note in adopting and learning ANTLR4Rust

Series


In the previous article, we built the minimal working example walking a parse tree using a listener. In this article, we are going to store a parsed CSV structure into a variable to use in the future.

Define a CSV structure:

1
2
3
4
5
type Row = Vec<String>;#[derive(Debug)]
struct CSV {
header: Row,
rows: Vec<Row>,
}

Add fields to a listener:

1
2
3
4
5
struct Listener {
csv: Box<CSV>,
add_to_header: bool,
row_to_add: Vec<String>,
}

csv will be a resultant CSV structure. add_to_header and row_to_add are internal state variables to generate a CSV structure.

Implement a listener:

1
2
3
4
5
6
7
8
9
10
11
12
13
14
15
16
17
18
19
20
21
22
23
24
impl CSVListener for Listener {
fn enter_csvFile(&mut self, _ctx: &CsvFileContext) {}
fn exit_csvFile(&mut self, _ctx: &CsvFileContext) {}
fn enter_hdr(&mut self, _ctx: &HdrContext) {
self.add_to_header = true;
}
fn exit_hdr(&mut self, _ctx: &HdrContext) {
self.csv.header = self.row_to_add.to_vec();
self.row_to_add.clear();
self.add_to_header = false;
}
fn enter_row(&mut self, _ctx: &RowContext) {}
fn exit_row(&mut self, _ctx: &RowContext) {
if self.add_to_header {
return;
}
self.csv.rows.push(self.row_to_add.to_vec());
self.row_to_add.clear();
}
fn enter_field(&mut self, _ctx: &FieldContext) {}
fn exit_field(&mut self, _ctx: &FieldContext) {
self.row_to_add.push(_ctx.get_text());
}
}

Feed an input to a parse and extract the result:

1
2
3
4
5
6
7
8
9
10
11
12
13
14
15
16
17
18
19
20
21
22
23
fn main() {
let input = String::from(
"This, is, a, header
This, is, a, row
",
);
let lexer = CSVLexer::new(Box::new(InputStream::new(input)));
let token_source = CommonTokenStream::new(lexer);
let mut parser = CSVParser::new(Box::new(token_source));
let listener_id = parser.add_parse_listener(Box::new(Listener {
csv: Box::new(CSV {
header: Row::new(),
rows: Vec::new(),
}),
add_to_header: false,
row_to_add: Row::new(),
}));
let result = parser.csvFile();
assert!(result.is_ok());
let listener = parser.remove_parse_listener(listener_id);
let csv = listener.csv;
println!("{:#?}", csv);
}

A tricky part is that we have to extract csv from listener. And to this end, we have to extract listener with listener_id.

The minimal working example can be found here.

Quick start on ANTLR4 in Rust - part1

This is my note in adopting and learning ANTLR4Rust

Series


Install nightly version of Rust (and make it default if you want for convenience).

1
2
$ rustup toolchain install nightly
$ rustup default nightly

Get ANTLR4 runtime for Rust from here:

Prepare a grammar. I will use an example grammar: https://raw.githubusercontent.com/antlr/grammars-v4/master/csv/CSV.g4

Generate a parser:

1
$ java -jar <ANTLR4 runtime path> -Dlanguage=Rust CSV.g4

You will get csvlexer.rs, csvlistener.rs , csvparser.rs . Place them into your project src directory.

Add dependencies in Cargo.toml:

1
2
3
[dependencies]
lazy_static = "1.4"
antlr-rust = "0.1"

Add a feature and import lazy_static macros to the root module:

1
2
3
#![feature(try_blocks)]
#[macro_use]
extern crates lazy_static;

Import common and essential things:

1
2
3
4
use antlr_rust::common_token_stream::CommonTokenStream;
use antlr_rust::input_stream::InputStream;
use antlr_rust::parser_rule_context::ParserRuleContext;
use antlr_rust::tree::{ErrorNode, ParseTreeListener, TerminalNode};

Import grammar-specific things:

1
2
3
4
5
6
mod csvlexer;
mod csvlistener;
mod csvparser;
use csvlexer::CSVLexer;
use csvlistener::CSVListener;
use csvparser::*;

Implement ParseTreeListener, a supertraint of CSVListener:

1
2
3
4
5
6
struct Listener;impl ParseTreeListener for Listener {
fn visit_terminal(&mut self, node: &TerminalNode) {}
fn visit_error_node(&mut self, node: &ErrorNode) {}
fn enter_every_rule(&mut self, ctx: &dyn ParserRuleContext) {}
fn exit_every_rule(&mut self, ctx: &dyn ParserRuleContext) {}
}

Implement CSVListener:

1
2
3
4
5
6
7
8
9
10
impl CSVListener for Listener {
fn enter_csvFile(&mut self, _ctx: &CsvFileContext) {}
fn exit_csvFile(&mut self, _ctx: &CsvFileContext) {}
fn enter_hdr(&mut self, _ctx: &HdrContext) {}
fn exit_hdr(&mut self, _ctx: &HdrContext) {}
fn enter_row(&mut self, _ctx: &RowContext) {}
fn exit_row(&mut self, _ctx: &RowContext) {}
fn enter_field(&mut self, _ctx: &FieldContext) {}
fn exit_field(&mut self, _ctx: &FieldContext) {}
}

Read and parse an input. Note that csvFile in the last line is a rule name in CSV.g4:

1
2
3
4
5
6
7
8
9
10
11
12
fn main() {
let input = String::from(
"This, is, a, header
This, is, a, row
");
let lexer = CSVLexer::new(Box::new(InputStream::new(input)));
let token_source = CommonTokenStream::new(lexer);
let mut parser = CSVParser::new(Box::new(token_source));
parser.add_parse_listener(Box::new(Listener {}));
let result = parser.csvFile();
assert!(result.is_ok());
}

The minimal working example can be found here.

Positioning system using DecaWave DW1000

DecaWave’s DW1000

DW1000 is a UWB communication and ranging module manufactured by DecaWave.
It provides a fairly good ranging accuracy (< 2 cm). Not only a simple anchor-tag ranging system, let’s make a practical centimeter-level precision indoor positioning system using it

System Design

Overview

A setup is shown in a figure below:
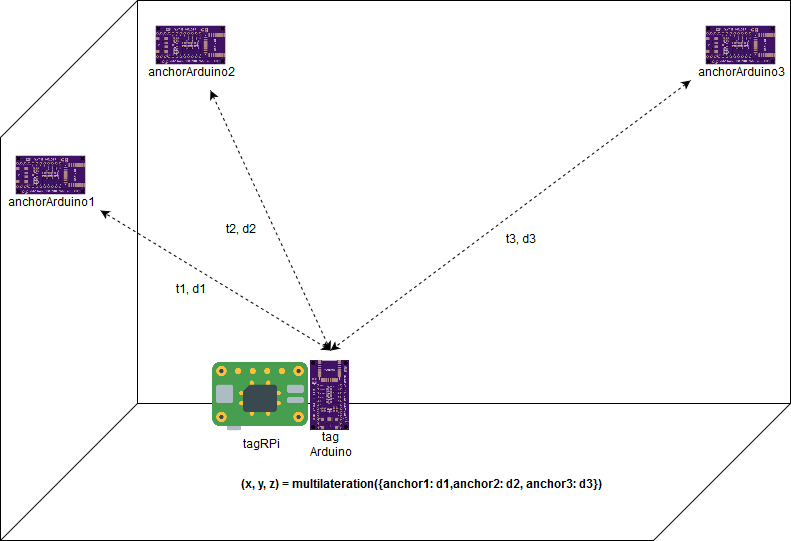
  • A tag
    • A tag is composed of two components—Raspberry Pi and Arduino Pro Mini
    • Raspberry Pi controles a higher level indoor positioning system
      • It triggers Arduino Pro Mini to probe anchors and measure distance between it and each anchor
      • It requests distance measurements on Arduino Pro Mini and locate itself through trilateration
    • Arduino Pro Mini
      • It is required due to similar reasons of anchors
      • It receives commands from Raspberry Pi and executes the corresponding process
        Processes are:
        • Probing anchors nearby and exchanging series of frames with each anchor
          to measure distance
        • Reporting probed anchors and measured distance values
  • Anchors
    • They are deployed in a site of interest and their 2D/3D coordinates are known
    • They are implemented on Arduino Pro Mini for the following reasons:
      • Arduino Pro Mini’s low power consumption
      • Anchor’s fast response requirement (order of milliseconds)
      • Anchor’s simple tasks (receiving and transmitting UWB frames)

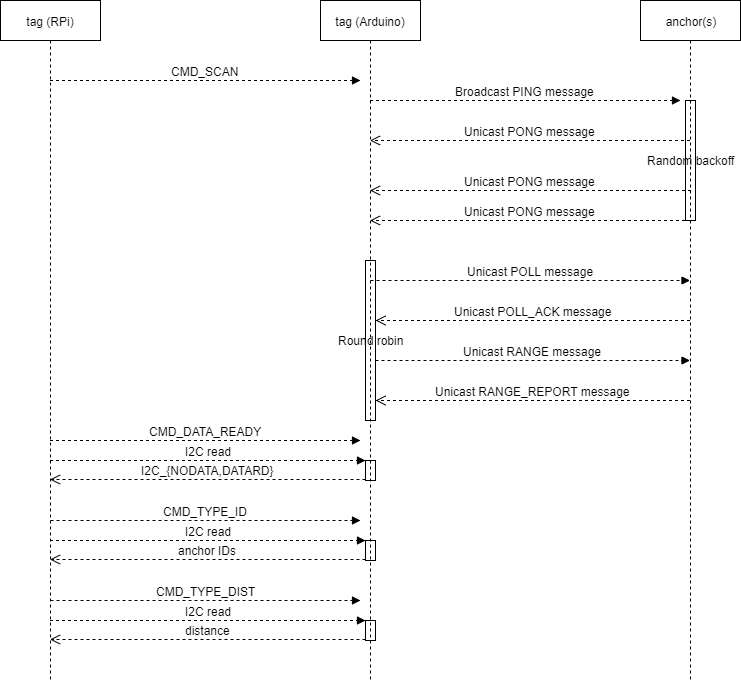
An overall sequence diagram is illustrated below. Tag (Arduino) is actually composed of Arduino Pro Mini and DW1000.

State Machine: Tag

A figure below is a state diagram of a tag:

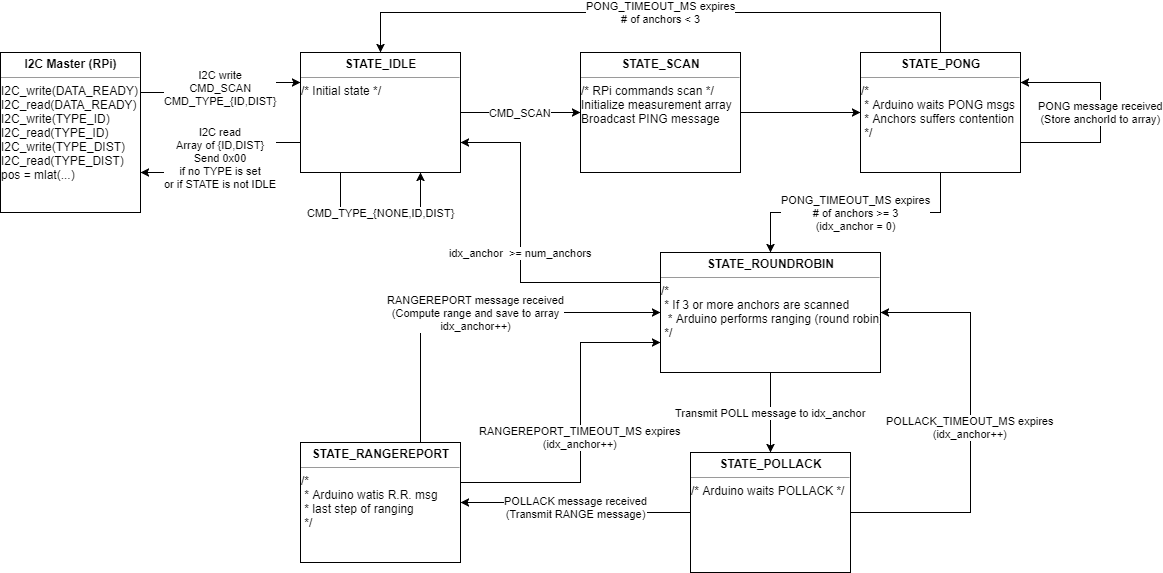
When a Raspberry Pi commands via I2C to scan, it goes into SCAN state and broadcasts a PING message. Going into PONG state immediately, it waits for PONG messages from anchors nearby for a certain duration. I set it to 100 ms.

If it discovers 3 or more anchors during the PONG state, it goes into ROUNDROBIN state. It exchanges 4 messages with each discovered anchor sequentially, i.e. POLL to an anchor, POLL_ACK from an anchor, RANGE to an anchor, and RANGE_REPORT from an anchor. After sending POLL and RANGE message, it waits for a response message for a certain timeout of 10 ms.

After 4 messages are exchanged with each anchor, it calculates distance between an anchor using Tx/Rx timestamp. It adopts two-way ranging algorithm, which is a bit computational intensive, but I think it is not that much intensive. For more information about two-way ranging, please refer the official appliclation note APS013 by DecaWave.

State Machine: Anchor

A state diagram of an anchor is simple:

  • It normally stays at IDLE state
  • If it receives a PING message, it tries to send a PONG message with a random delay between 0 and 90 ms to avoid the collision and goes into PENDING_PONG state
  • If it receives a POLL message and sends a POLL_ACK message, it goes into RANGE state and waits for a RANGE message is received
    • If timeout of 10 ms expires, it returns to IDLE state
    • If it receives a RANGE message, it sends a RANGE_REPORT message to a tag

Implementation

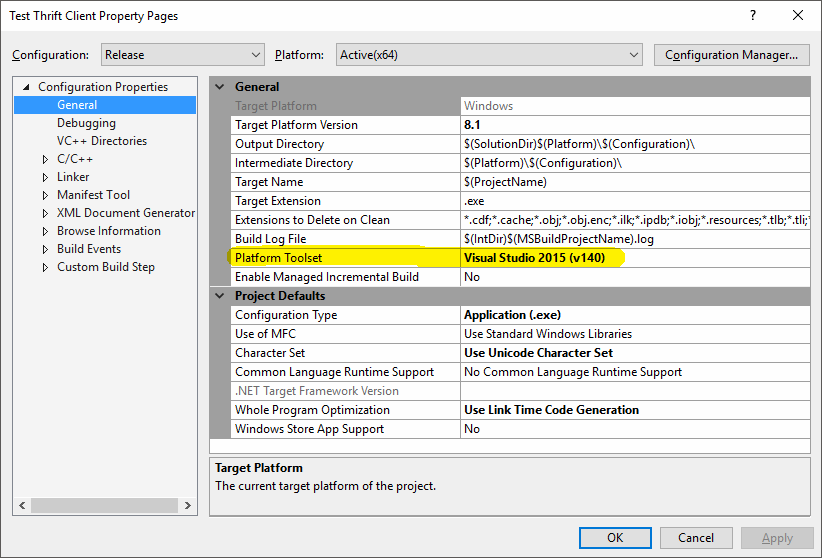
The whole implementation can be found in my GitHub repository. I used arduino-dw1000 for controlling DW1000 using Arduino. I followed wiring between Arduino Pro Mini and DW1000 as defined in examples/Ranging{Anchor,Tag} of the library. Only I2C interface is needed to connect Raspberry Pi and Arduino Pro Mini

Building Thrift on Windows 10

Contrast to Linux and macOSs, many are having difficult times building and using Thrift on Windows 10. Most Thrift guides on the internet miss some parts. Here’s the correct way to build and use Thrift on Windows 10.

Dependencies

  • Boost
  • OpenSSL (for secure socket)
  • libevent (for callback)

Boost

  • Download boost. At this time of writing, the latest version is 1.64.0. I downloaded boost_1_64_0-msvc-14.1-64.exe.
    • You must download a correct binary with consideration of OS addressing mode (32/64 bits) and MSVC version
    • You can check MSVC version in a project property page of a project which will use Thrift
  • Execute the downloaded file to extract files. In my case, C:\boost_1_64_0

  • Open **Native Tools Command Prompt** and execute the following commands

    1
    2
    3
    4
    5
    6
    cd C:\boost_1_64_0
    bootstrap
    b2 --build-type=minimal --stagedir=stage/x64 ^
    threading=multi link=static toolset=msvc-14.0 ^
    variant=release address-model=64 architecture=x86 ^
    -j8

    Options are:

    • stagedir: directory to store built files
    • threading=multi: build thread-safe Boost
    • link=static: build static Boost library
    • toolset=msvc-14.0: Visual Studio MSVC (Platform Toolset) used for a project
    • variant=release: Debug/Release configuration used for a project
    • address-model=64: addressing mode of your OS
    • architecture=x86: your CPU architecture

OpenSSL

  • Download OpenSSL v1.0.2L binary (not light version)
    • v1.1.0 causes an SSLv3_method-related error when building Thrift, at least in my case
    • Be careful of the addressing mode of your OS
  • Install OpenSSL by executing the downloaded file. I installed it under C:\OpenSSL-Win64

libevent

  • Download libevent-2.0.22 (v2.1.8 has an issue)
  • Extract it under C\:libevent-2.0.22-stable, or whereever you want
  • Open **Native Tools Command Prompt** and build it by executing nmake -f Makefile.nmake

Building Thrift

  • Download Thrift 0.9.2 (v0.9.3 and later version have an issue) and extract it to somewhere (C:\thrift-0.9.2, in my case)
  • Open a solution thrift.sln under C:\thrift-0.9.2\lib\cpp. There are two projects: libthrift and libthriftnb
  • Open property pages and adjust Target Platform Version and Platform Toolset as the same as a project which you are working on
  • Set parameters as the following:
    • libthrift

      • C/C++ > General > Additional Include Directories
        • C:\OpenSSL-Win64\include, C:\boost_1_64_0
      • Librarian > All Options
        • Additional Dependencies
          • libeay32.lib, ssleay32.lib, libeay32MT.lib, ssleay32MT.lib
        • Additional Library Directories
          • C:\OpenSSL-Win64\lib, C:\OpenSSL-Win64\lib\VC\static

      Note that you need to add other library files and directories according to static/dynamic link and Debug/Release configuration

    • libthriftnb

      • C/C++ > General > Additional Include Directories
        • C:\libevent-2.0.22-stable\include, C:\libevent-2.0.22-stable\WIN32-Code, C:\libevent-2.0.22-stable, C:\boost_1_64_0
  • Build libthrift and libthriftn sequentially

Testing Thrift

  • Grab the example code and make a project for each server and client

  • Get the Thrift compiler and compile Thrift definition files above

  • Set parameters of each project as the following:

    • C/C++ > General > Additional Include Directories
      • C:\boost_1_64_0, C:\thrift-0.9.2\lib\cpp\src\thrift\windows, C:\thrift-0.9.2\lib\cpp\src
    • Linker > All Options
      • Additional Dependencies
        • libthrift.lib
      • Additional Library Directories
        • C\:thrift-0.9.2\lib\cpp\x64\Release, C:\boost_1_64_0\stage\x64\lib

          Note: you may need to add other directories according to Debug/Release configuration

  • Build and start a server project and then a client project. You can see Thrift working

Reading ranging data from DecaWave EVK1000

DecaWave EVK1000 and TREK1000

EVK1000 and TREK1000 are Two-way Ranging Evaluation Kit for DecaWave’s UWB DW1000 chip. You can see and evaluate a ranging result on a screen of each of them. However, to see a positioning result, you need to connect one of them with a PC and use DecaWave’s dedicated software only on Windows. Here’s how to read data from EVK1000 without the dedicated software

Preparing a Driver

This kit has a COM (serial) port. But this port is wrapped with USB interface and operates with a virtual COM port driver

  • On Windows, a driver for this (STM32 Virtual ComPort in FS Mode v1.4.0) can be downloaded at here. After downloading and extracting the file, run <OS>/dpinst_<arch>.exe where <OS> and <arch> are your OS and architecture, respectively. A related thread can be found here
  • On Linux and macOS, when a board is connected, a driver will be automatically loaded

For more detail, please refer FTDI Chip

Reading and Parsing Ranging Data

Configure anchors and a tag by flipping switches as instruction says, and connect an anchor or a tag with a PC. Since it uses a virtual COM port, serial communication parameters are automatically configured and you don’t need to worry about it

When connection is successful, you can see outputs on a serial port terminal as the following:

1
2
3
4
5
6
7
8
9
10
11
mr 01 000004d1 00000000 00000000 00000000 001e 20 403c403c t7:0
mc 01 0000058c 00000000 00000000 00000000 001f 21 00003fe5 t7:0
mr 01 000004ba 00000000 00000000 00000000 001f 21 403c403c t7:0
mc 01 0000059a 00000000 00000000 00000000 0020 22 000040fd t7:0
mr 01 000004c8 00000000 00000000 00000000 0020 22 403c403c t7:0
mc 01 00000579 00000000 00000000 00000000 0021 23 00004215 t7:0
mr 01 000004a7 00000000 00000000 00000000 0021 23 403c403c t7:0
mc 01 0000059a 00000000 00000000 00000000 0022 24 0000432d t7:0
mr 01 000004c8 00000000 00000000 00000000 0022 24 403c403c t7:0
mc 01 00000574 00000000 00000000 00000000 0023 25 00004445 t7:0
...

Here, important columns are from the 3rd to 6th, 7th, 8th columns

  • The 3rd to 6th columns represent a range measurement from each anchor 0 to 3 in hexadecimal
    • For example, 000004d1 represents 0x4d1 or 1233, which is 1.233 m.
  • The 7th column represents a sequence number
  • The 8th column represents a ranging sequence number